For a while now, there has been a lot of talk about CSS pre-processors such as LESS and SASS. As the the details of how such pre-processors work as well as their benefits and drawback have been discussed many places, I will not discuss that here. Instead, I will focus on how I use SASS on my WordPress sites.
First, I always want to use the Compass CSS Authoring Framework. This framework comes with its own mixins, making CSS3 easy – you never have to worry about vendor prefixes! And, it supports all of the standard SASS rules, variables and selector inheritance. To make life even easier, there is an app that even lets you avoid the command line.
Using the Compass App
I am going to step through the process of using the Compass app on a mac. After successfully installing compass.app, you will get a new icon in the top toolbar area.
![]()
- Click the icon and select “Create compass project” and then “compass” and finally “project”
- You will then see a finder window where you can select the location for your sass and css files. I usually place my compass created project in the directory for my theme.
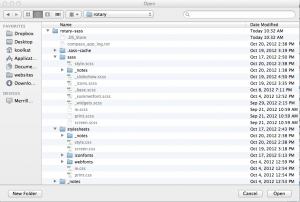
- Let’s say you called your directory “rotary-sass”, which for me resides in the directory “wp-content/themes/rotary”, you will end up with a file structure like this in your theme directory:
- Now we can set some options. Click the compass icon again (which should now have turned orange, indicating an active project) and then click “Change Options”. My personal preference during development is for expanded CSS output, no line comments but debug checked. The reason for checking debug is that it will enable us to use the Firefox extension, FireSass. FireSass allows Firebug to display the original SASS filename and line numbers. Otherwise, you would just see the generated CSS line numbers making troubleshooting much more difficult. You can change the options once your project is finished so you can deliver compress CSS without the debug info.
- Now that your project is set, all your changes to the SASS files will automatically change your CSS.
- Next we need to tell WordPress where our new stylesheets reside. The necessary code will both display the correct CSS rule for your project and return the correct directory and/or file for WordPress API calls such as get_stylesheet_uri(). You can add the following code to your functions.php file or a file included in your functions.php:
/**
* overwrite default theme stylesheet uri
* filter stylesheet_uri
* @see get_stylesheet_uri()
*/
add_filter('stylesheet_uri','rotary_stylesheet_uri',10,2);
function rotary_stylesheet_uri($stylesheet_uri, $stylesheet_dir_uri){return $stylesheet_dir_uri.'/rotary-sass/stylesheets/style.css';
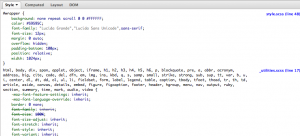
} - Finally, make sure that you have both FireBug and FireSass installed as add-in in your Firefox browser. If all is working correctly, your CSS debug info should show the location of your code in the SASS files. Notice that any included files from Compass also show up.


-0 Comments